Real camera lenses have distortion, but virtual cameras in 3D software don’t, which leads to renders with straight lines.
To blend CG with real footage, you need to apply lens distortion. This can create empty edges on the render.
Overscan helps solve this by rendering with extra margin, ensuring that after distortion, the frame remains complete.
In this guide, we’ll show how to apply overscan in various 3D software tools.
Overscan through Nuke camera
Why do you need an overscan
Screenshot 1 shows a grid with lens distortion. You can see how straight lines are distorted at the edges.

Let’s assume that the CG object is at the edge of the frame (screenshot 2)

In order for a CG object to render correctly in the footage, you must apply distortion to it that corresponds to the lens.
In this case, after distortion is applied, the CG part will be stretched and “tiling” will occur.

To find out which overscan is needed, you can look at the bounding box settings in Nuke.
The dotted box shows how much the image extends beyond the edges.

You can also create a reformat node with these parameters:


It is important to note that overscan is not just an increase in render resolution.
It is an increase in the field of view of the camera + an increase in the resolution of the CG renderer.
Cinema 4D
To create an overscan in Cinema 4D there is a handy xpresso script that will create a new camera with overscan values.
To do this, add Canvassizecamera to your project and select the xpresso tag.

Next, in the camera parameter you need to create a link to your 3D camera.
After that specify old resolution and new resolution with overscan and then make the Canvassizecamera camera active.
Don’t forget to specify the new resolution in the project render settings.

As a result, the renderer will have an increased FoV.
Houdini
Mantra
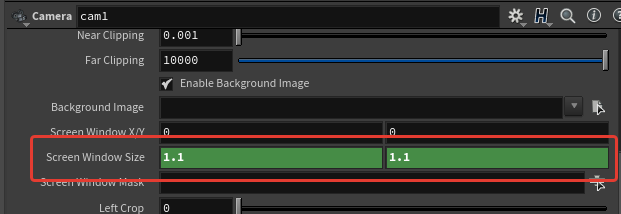
To get overscan you need to go to the camera settings, View tab and then in the Resulution field specify how many percent overscan is needed.

Then specify a new value in the Screen Window Size field. In the case of the example it is 1.1

When rendering, select the desired camera with the applied modifications and do not change the resolution in the render settings.
Karma
To specify overscan parameters, go to the render settings, Image Output → Aspect Ratio tab. In the Data Window NDC field specify the required parameters.
For example, an overscan of 10% will have the following parameters: -0.1, -0.1, 1.1, 1.1

Note that the first two fields must have negative values.
Houdini Docs:
The default is 0, 0, 1, 1 (no cropping). Note that you can use negative values.
For example, -0.1, -0.1, 1.1, 1.1 will give you 10% overscan on each side.
Blender
In order to apply overscan in Blender it is necessary to install Addon.
The addon has been tested in program version 3.5.1.
Download Camera Overscan Script (Python)
Download Overscan Background Popover Script (Python)
Installation Instructions
Place both files in the following path:
Windows: C:\Users\{USER}\AppData\Roaming\Blender Foundation\Blender\3.5\scripts\addons
Linux: HOME/.config/blender/3.5/scripts/addons
macOS: /Users/$USER/Library/Application Support/Blender/3.5/scripts/addons
Then run the program, go into the settings and enable addons:

After that, an additional button will appear in the viewer, which will open the menu.

Overscan Percentage – specify the percentage of overscan;
Toggle Overscan – increases overscan by the specified percentage;
Restrore Original Settings – returns original parameters.
Maya
To set an overscan in Maya, regardless of the renderer, you need to go into the render settings:

Specify a new resolution with overscan. For example, if you need 10% overscan, then the new resolution for 1920×1080 will be 2112×1188.
Then, in Outliner, select the required camera and in the camera attributes, change the Camera Scale parameter by specifying the required FoV increase of the camera. For example, at 10% you should specify 1.1.

Conclusion
Now you understand the purpose of overscan and how to work with it in various 3D packages.
For convenience, you can use a ⚙️🔧 script for Nuke that automates the process of creating overscan and preparing nodes for its further use.

